KAPE Hands on Labs
Interactive Lab
gkape Interactive Lab
Preserve files from a Windows workstation, review a collection gap and prepare a finding for the next analyst.
A suspicious download. Preserve the clues.
A user on SUSA-WIN01 reports opening an unexpected download. Your job is to collect useful Windows files for another analyst to examine. You are allowed to collect from this workstation's C:\ volume. Use D:\SUSA-021\KAPE, a new folder on a separate evidence disk, for the results.
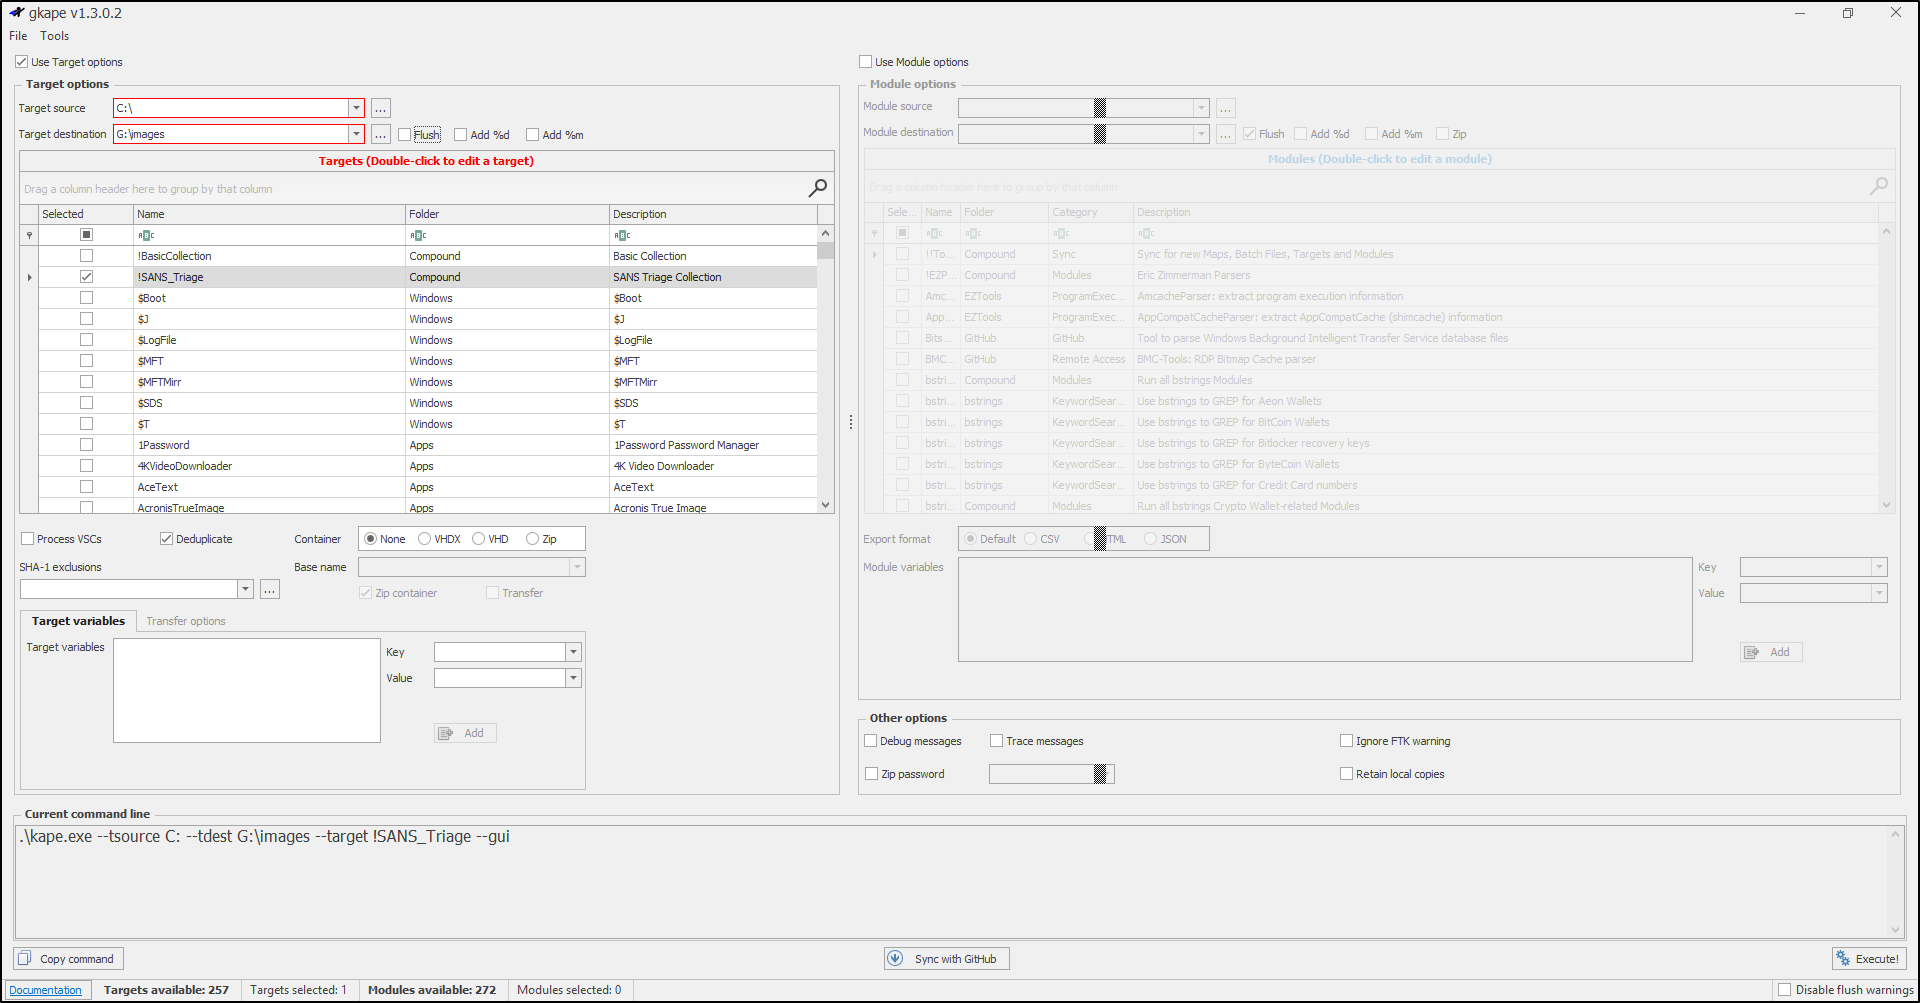
Select !SANS_Triage, the compound Target in the case plan. A Target tells KAPE which files to copy; a Module runs tools to process files. Leave Use Module options off for this collection only exercise.
The grey window follows the real gkape v1.3.0.2 layout. Red labels and borders mark required fields. Blue panels are lab instructions. All files, counts and logs are sample data; nothing is collected from your computer. Unavailable controls are greyed out. Actual results depend on your system and Target definitions.
Enter C:\ as Target source and D:\SUSA-021\KAPE as Target destination.
- 1 · Paths
- 2 · Target
- 3 · Review
- 4 · Run
- 5 · Inspect
- 6 · Explain
Enter the source and destination to begin.
Read the selected Target definition
This is a read only training summary. In real gkape, double click opens the definition editor. Keep the full .tkape definition set with your case notes.
Check what was actually collected
Use the buttons below to switch between the collection logs and collected files. Inspect both views: check the source and destination in the copy log, read the console warning and compare the file paths with the selected Target. A completed run can still have missing files.
Copylog.csv · selected sample columns
Scroll the table sideways to see the destination and timestamp columns.
| SourceFile | DestinationFile | CopiedTimestamp |
|---|
ConsoleLog · sample warning
Collected files · sample folder listing
Targets copy files with their directory structure. These are collected files, not parsed reports or a full disk image.
What can you tell the next analyst?
Inspect the collection logs and collected files before choosing your finding.
What you learned · Next steps
You collected files with a Target, reviewed the copy log, identified a gap and explained the limits of the results. Next, an analyst can use Modules or standalone tools to parse a working copy of relevant files and compare the results. Collection alone does not prove execution or compromise.
In the Full Lab, practise this workflow on a Windows VM with a harmless training file.
Continue to the Full LabInterface reference: SUSA's gkape v1.3.0.2 screenshot. Workflow: Kroll's gkape guide. Target scope: official !SANS_Triage definition. This exercise shows a subset of controls and files.
Full Lab
KAPE Full Lab
Case SUSA-021 / first response
A reported download. A triage set. Your next move.
A user reports opening an unexpected download. Your first job is to preserve useful Windows artefacts before deciding what happened. Practise on a harmless text file, collect with gkape, and hand over evidence another analyst can locate and check.
Tick a checkpoint only after saving its evidence. Progress is self reported; this page cannot check your VM.
Investigation brief
One disposable Windows VM: collect from C:\ to an attached evidence disk at D:\SUSA-021\KAPE.
Real case connection: scoped collection, retained logs, coverage checks, and an evidence handover are first response tasks. This live collection changes the VM and captures selected artefacts; it is not a full disk image or a memory capture.
Before you start
Need: an isolated Windows 10 or 11 VM you own, administrator access, Windows PowerShell 5.1, KAPE extracted at C:\Tools\KAPE, and a separate writable virtual disk attached as D:. Use an NTFS C: volume and start from a clean snapshot. Keep the case evidence disk outside the rollback of the Windows disk.
Your route: complete the three activities. Open one numbered step at a time, copy its commands into the VM, and check each Look for result. Keep that PowerShell window open. The optional file hunt adds one parser only after the core collection succeeds.
Need setup help?
Follow Install and open KAPE and attach a second virtual disk using your hypervisor. Initialise and format only that new, empty training disk in Disk Management, then assign D:. If D: is already a DVD drive or another disk, resolve the drive letter before using these examples. Confirm it is a separate disk from C: and has enough free space; triage size depends on the VM. Leave the source, program folder, and destination distinct.
Record the KAPE archive source, date, version, and SHA-256. Use the downloaded build's version, not the version shown in the browser simulation. Do any definition updates before the lab; keep the same definition set throughout.
Activity 1: Build the environment
1. Create a fresh case on the evidence disk
Open Windows PowerShell as administrator on the VM. These commands refuse to reuse an existing case folder. If repeating the lab, choose a new case path and use it consistently.
$kapeCase = 'D:\SUSA-021'
$kapeOutput = Join-Path $kapeCase 'KAPE'
if (-not (Test-Path -LiteralPath 'C:\Tools\KAPE\gkape.exe')) { throw 'Install KAPE first.' }
Get-Volume -DriveLetter C, D -ErrorAction Stop |
    Select-Object DriveLetter, FileSystem, SizeRemaining, Size | Format-Table
if (Test-Path -LiteralPath $kapeCase) { throw 'Case folder exists. Choose a new case path.' }
New-Item -ItemType Directory -Path $kapeCase -ErrorAction Stop | Out-Null
New-Item -ItemType Directory -Path $kapeOutput -ErrorAction Stop | Out-Null
@(
    'Case: SUSA-021 / authorised training VM'
    "Computer: $env:COMPUTERNAME"
    "Local time: $(Get-Date -Format o)"
    "Time zone: $((Get-TimeZone).Id)"
    'Source: C:\'
    "Destination: $kapeOutput"
    'Target: !SANS_Triage / collection only'
) | Set-Content -LiteralPath "$kapeCase\case-context.txt"
notepad.exe "$kapeCase\case-context.txt"
Look for: two volume rows and an empty KAPE folder on D:. Add the clean snapshot name, KAPE version, archive provenance and checksum to case-context.txt in Notepad, then save. Confirm the free space figure is suitable before continuing.
2. Plant and open the harmless training clue
Create a plain text file in this VM account's Downloads folder and open it in Notepad. This stands in for the reported download; it contains no malware, and is not an actual browser download. Record the controlled change so you can distinguish training activity from other VM activity.
$kapeSeed = Join-Path $env:USERPROFILE 'Downloads\SUSA-021-training-note.txt'
if (-not (Test-Path -LiteralPath (Split-Path $kapeSeed))) { throw 'Downloads folder missing. Check this VM profile.' }
if (Test-Path -LiteralPath $kapeSeed) { throw 'Training file exists. Use a fresh snapshot.' }
'SUSA-021 harmless training clue. Opened for the KAPE lab.' |
    Set-Content -LiteralPath $kapeSeed -ErrorAction Stop
Get-Item -LiteralPath $kapeSeed | Select-Object FullName, Length, CreationTimeUtc |
    Export-Csv -LiteralPath "$kapeCase\training-file.csv" -NoTypeInformation
Get-FileHash -Algorithm SHA256 -LiteralPath $kapeSeed |
    Export-Csv -LiteralPath "$kapeCase\training-file-sha256.csv" -NoTypeInformation
"Opened in Notepad at: $(Get-Date -Format o)" |
    Set-Content -LiteralPath "$kapeCase\training-action.txt"
notepad.exe $kapeSeed
Look for: your training text in Notepad and three training records on the evidence disk. Close the training document without editing it.
Predict before collecting: will a triage Target copy every Downloads file? No: it follows its definitions. A file can leave filesystem metadata even when its contents are outside the collection scope. You will check the returned coverage rather than assume the text file was copied.
Next: preserve the selected Windows artefacts.
Continue to collectionActivity 2: Collect the triage set
1. Configure gkape and check the scope
Open C:\Tools\KAPE\gkape.exe as administrator. Use the collection guide for screenshots if needed.
| Setting | Choose for this lab |
|---|---|
| Target source | C:\ |
| Target destination | D:\SUSA-021\KAPE (or your fresh case's KAPE folder) |
| Target | Only !SANS_Triage |
| Modules | Leave disabled; collect first |
| Container | None, so you can inspect the folders |
| Flush | Leave unchecked; do not clear an earlier output folder |
A Target describes what to copy. A Module runs a processor against collected files. !SANS_Triage is a compound Target: it calls other Target definitions. Open C:\Tools\KAPE\Targets\Compound\!SANS_Triage.tkape in Notepad. Find the entries for filesystem metadata, Registry hives and execution artefacts; follow referenced definitions if you need their actual paths. Compare your installed definitions with the official Target; your installed set controls this run.
Preserve the full installed Targets folder in the case, including referenced definitions:
if (Test-Path -LiteralPath "$kapeCase\Target-definitions") { throw 'Definitions already saved. Inspect before repeating.' }
Copy-Item -LiteralPath 'C:\Tools\KAPE\Targets' -Destination "$kapeCase\Target-definitions" -Recurse -ErrorAction Stop
Look for: the correct source and destination in Current command line, one selected Target and no Modules. Save a screenshot of the settings and copy the complete command preview into run-notes.txt in the case folder. Record any additional options selected by your build.
2. Execute once and retain the run record
Record the start time in run-notes.txt, then select Execute. Wait for the collection to finish. Record the finish time and the reported outcome; keep a screenshot or saved text of the final console messages before closing the window. Duration and file count depend on this VM, so there is no required count to match.
Look for: files under your evidence destination and KAPE's copy or skip logs where provided. Keep the run's logs and warnings with the collection. An access warning is a coverage gap to investigate; a successful status does not prove that every requested file was copied.
Collection failed or returned very little?
| Symptom | First check |
|---|---|
| Empty Targets list | Confirm the entire KAPE archive was extracted and its Targets folder is present. |
| Execute is unavailable | Check the source, destination and selected Target. |
| Access or locked file errors | Check administrator access and retained console or copy logs. Record affected paths. |
| Disk full or little output | Check D: free space, source and Target scope. |
| Need to retry | Keep the first run and logs. Create a new empty destination, record why, and retain each run separately. Do not use Flush to erase the failed run. |
Next: check what the run actually returned.
Review your evidenceActivity 3: Review and report
Returning in a new PowerShell window?
Restore these variables on the same VM, using your actual case folder if you changed it. You do not need to collect again.
1. Find three useful artefact groups
Open the saved destination in File Explorer. KAPE may recreate the source tree beneath a drive letter folder; use the actual returned paths. Artefact means a record left by the system or an application. Start with only three groups:
| Find in the collection | Why an incident responder keeps it |
|---|---|
Windows .evtx files, typically from Windows\System32\winevt\Logs |
Event records to review for logons and system activity; available events depend on logging settings. |
Registry files such as SYSTEM, SOFTWARE, and user NTUSER.DAT |
System and user configuration to examine for persistence or account context. |
$MFT from the NTFS source |
File and directory metadata to investigate names, locations and timestamps. It is a binary file; use a parser to read it. |
Save an inventory and inspect a preview:
$kapeFiles = @(Get-ChildItem -LiteralPath $kapeOutput -Recurse -File -Force -ErrorAction Stop)
if ($kapeFiles.Count -eq 0) { throw 'Empty collection. Review the run before continuing.' }
$kapeFiles | Select-Object FullName, Length |
    Export-Csv -LiteralPath "$kapeCase\collection-inventory.csv" -NoTypeInformation
$kapeFiles | Where-Object { $_.Extension -eq '.evtx' -or $_.Name -in @('SYSTEM', 'SOFTWARE', 'NTUSER.DAT', '$MFT') } |
    Select-Object FullName, Length | Format-Table -AutoSize
Look for: nonzero file sizes and paths for the three groups. Write one actual path per group in coverage.txt; mark missing or empty groups and check the logs and definitions. An explained collection failure is a valid learning result, but it is not complete coverage. Do not equate missing output with no incident activity.
Small discovery: your text file need not appear in the copied files. Collection scope is defined by Targets, not everything on C:. You can investigate its metadata in the optional hunt below.
2. Save file fingerprints and make the analyst's call
Save a SHA-256 manifest outside the collected folder. A hash is a file fingerprint you can compare later. Hashing can take a while for a large collection; wait for the prompt to return and retain any read errors.
Get-ChildItem -LiteralPath $kapeOutput -Recurse -File -Force -ErrorAction Stop |
    Get-FileHash -Algorithm SHA256 -ErrorAction Stop |
    Export-Csv -LiteralPath "$kapeCase\collection-sha256.csv" -NoTypeInformation
Look for: collection-sha256.csv with a path and hash per readable collected file. These hashes describe the saved output; they do not establish complete source coverage or prove malware.
Optional detective task: find the training filename in $MFT
Ready to turn collection into a finding? Use MFTECmd on the saved $MFT, keeping derived output separate. This step is optional and does not add completion checkpoints.
Download MFTECmd from Eric Zimmerman's official tools page, extract it to C:\Tools\MFTECmd, and follow its runtime requirements. Record its version and source. The official command reference documents -f, --csv and --csvf. Use the actual collected $MFT from Activity 3, not the live source.
$kapeMftFiles = @(Get-ChildItem -LiteralPath $kapeOutput -Recurse -File -Force |
    Where-Object Name -EQ '$MFT')
if ($kapeMftFiles.Count -ne 1) { throw 'Expected one collected $MFT. Inspect coverage and source paths.' }
if (-not (Test-Path -LiteralPath 'C:\Tools\MFTECmd\MFTECmd.exe')) { throw 'Install MFTECmd for this optional task.' }
$kapeAnalysis = Join-Path $kapeCase 'Analysis'
if (Test-Path -LiteralPath $kapeAnalysis) { throw 'Analysis already exists. Keep it and choose a new output folder.' }
New-Item -ItemType Directory -Path $kapeAnalysis -ErrorAction Stop | Out-Null
& 'C:\Tools\MFTECmd\MFTECmd.exe' -f $kapeMftFiles[0].FullName --csv $kapeAnalysis --csvf 'mft.csv' 2>&1 |
    Tee-Object -FilePath "$kapeAnalysis\parser-log.txt"
if ($LASTEXITCODE -ne 0) { throw 'Parser failed. Read parser-log.txt.' }
$kapeMatches = @(Import-Csv -LiteralPath "$kapeAnalysis\mft.csv" |
    Where-Object FileName -EQ 'SUSA-021-training-note.txt')
$kapeMatches | Export-Csv -LiteralPath "$kapeAnalysis\training-file-matches.csv" -NoTypeInformation
$kapeMatches | Select-Object FileName, ParentPath, InUse, Created0x10, Created0x30 | Format-List
"Matching rows: $($kapeMatches.Count)" | Tee-Object -FilePath "$kapeAnalysis\search-result.txt"
Look for: a row with the training filename and the expected profile's Downloads path. Compare its creation timestamps with training-file.csv, accounting for the parser's time convention. Row counts can vary; inspect all matches. If none match, check the collected source, file creation before collection, parser log and CSV column headings. Save the no match result as a gap.
Your finding: a matching metadata record supports that the filename and location are represented in this collected filesystem record. It does not prove the user opened the document, its content, or malicious execution. Add the matched row, source $MFT path/hash, parser version and exact command to your handover; hash derived files separately if retaining them.
3. Write a short case handover
Copy this template into Notepad and save it as handover.txt in your case folder. Keep it short: use your own returned paths and actual warnings. Even if collection was incomplete, a clear limitation and next check make the note useful.
Case SUSA-021: reported unexpected download / controlled training file.
VM, snapshot, time zone, authority, source and destination:
KAPE version, archive source/hash, saved definitions and exact command:
Collection start/finish, outcome and retained log paths:
Coverage: event-log path; Registry path; $MFT path; missing/empty groups.
Integrity: collection-sha256.csv and any hash/read failures.
Observation: what the saved files actually show.
Interpretation: what this supports, with confidence and reasons.
Limits: selective live collection; warnings; no malware verdict from collection.
Next check: one artefact to analyse and the question it could answer.
Optional hunt: matching row or gap, source $MFT/hash, parser and command.
Closeout: evidence copy checked; training file removed; VM restored if used.
Choose your next move: for the reported download, examine relevant browser download records to establish a recorded URL/path, or parse filesystem metadata to examine the reported filename. Execution needs separate corroboration, such as applicable execution artefacts or event records. Your controlled Notepad opening is ground truth for the exercise, not evidence that collection independently proved it.
Case closeout4. Preserve evidence before resetting the VM
Check the collection, logs, notes, definitions, inventory and hash manifest. Copy the complete case folder outside the VM or retain its separate evidence disk; open the retained copy before rolling back the Windows snapshot.
Close the training document. On the VM, check the training file against its recorded hash before removing that exact file:
$kapeRecorded = @(Import-Csv -LiteralPath "$kapeCase\training-file-sha256.csv")
if ($kapeRecorded.Count -ne 1 -or $kapeRecorded[0].Path -ne $kapeSeed) { throw 'Check the recorded training path.' }
if ((Get-FileHash -Algorithm SHA256 -LiteralPath $kapeSeed -ErrorAction Stop).Hash -ne $kapeRecorded[0].Hash) {
    throw 'Training file changed. Inspect it before cleanup.'
}
Remove-Item -LiteralPath $kapeSeed -ErrorAction Stop
Look for: the training file is gone and the retained case is readable. Record cleanup in the handover, close gkape and shut down the disposable VM before restoring its Windows disk snapshot. Keep the evidence disk and case records.
Finish with a handover someone else can verify from your files.
Review the evidence checklistFull Lab evidence checklist
- 1Context
case-context.txt,training-file.csv,training-file-sha256.csvandtraining-action.txt - 2Collection
KAPE/, run logs, settings screenshot,run-notes.txtandTarget-definitions/; keep failed/retried runs separately - 3Finding
collection-inventory.csv,coverage.txt,collection-sha256.csvor explained hash errors, andhandover.txt
Your win: you can identify what a real KAPE run preserved, describe its gaps, and give another analyst a sensible next step. Keep optional parser output in Analysis/.